Hardwiring an Evo 7/8/9 Fuel Pump (Crosses over to evo 4,5+6)..
Hardwiring the fuel pump is a good method to ensure you get the maximum output from the standard 'intank' fuel pump, be it the oem mitsubishi one or the most commonly used aftermarket pump, the Walbro GS342. Although you may not realise it, you lose around 2 volts between the battery and the pump, this is known as 'voltsdrop' and is caused by the resistance in the oem wiring. A way to increase the voltage at the pump is to take a feed straight from the battery, via a relay, run in a thicker cable, and thus giving you less resistance = more voltage. This method is relatively easy on the Evo 7/8/9, it is slightly harder on the Evo 4/5/6 given the limited access but the wiring method is the same.


|
As always when working on the electrics, before you do anything, disconnect the battery!
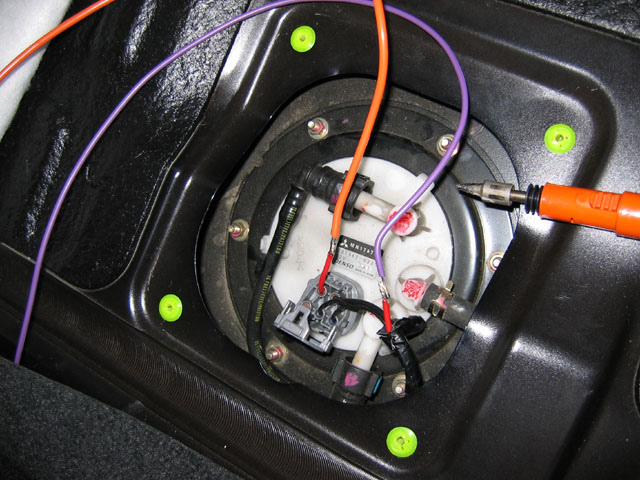
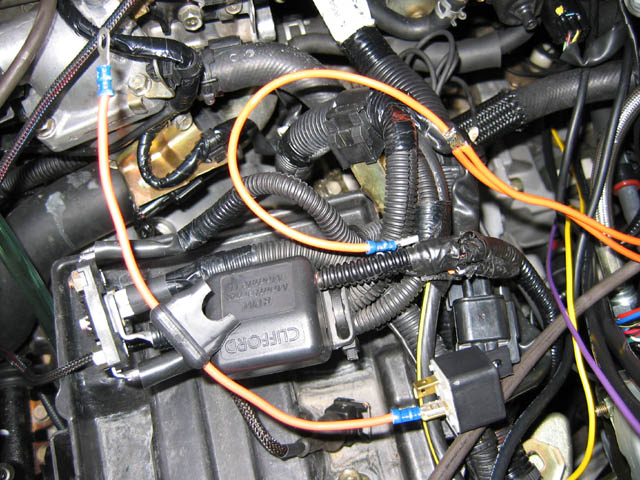
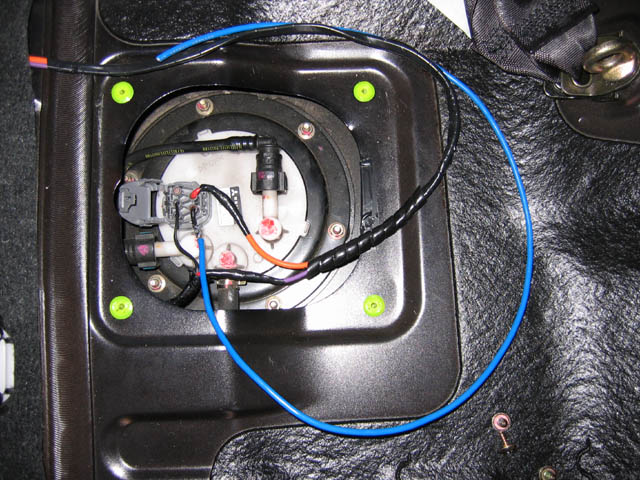
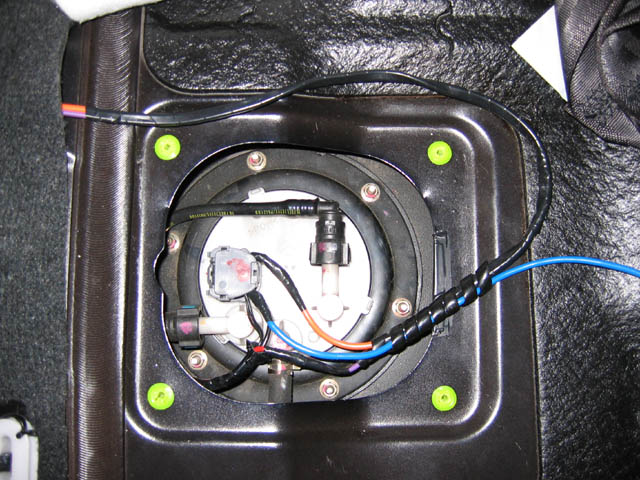
Access to the pump is via the inspection hatch under the rear seat. The wire i would recommend to use is 1mm for the relay tigger wire, and either 2.5mm or 4mm wire for the new supply. The thicker the supply wire the better, as you will lose less volts, however you need to offset this against how easy it is going to be to run the new wiring in place. After you have ran in two new wires from the engine bay to the inspection hatch, the wire you need to cut is the main red oem feed to the pump. The feed into the pump's top plug needs the new thick supply wire soldering to it, and the original feed needs the thinner relay wire soldering to it. In the photo to the left my wires are : Orange : New Supply Wire. Purple : Relay Trigger Wire. Once you have soldered the wires in place, make sure you insulate the connections well using either heat shrink, or if you dont have any available, Electricians tape like i have done. As you can see i have also taped the two wires together, and added a few layers to the metal work were they run, to help protect them against chaffing. It has also been suggested that you can use insulated crimp connectors in place of soldered joints if you are not confident in soldering - this also means you'll have no nasty burns in your carpet should the unfortunate happen! Modifying the cover is easy, simply place the edge where the wires run on top of something round, say a 10mm socket, and hit either side with a hammer so as just to give enough room so you dont squash the cables when the cover is put back into place. In the engine bay things are relatively as easy. You need a small relay, i used a 40amp one, and to that you need to connect the main supply off the battery. This needs to be fused as you can see on the peice of wiring on the left of the photo. The wiring on the right is the new thick supply wire that runs to the fuel pump. In this photograph you can see that i have actually soldered another wire to it, this is for a second fuel pump (a Bosche 044), which i run in-line with the Walbro in tank pump. So with the relay's supply in and out sorted with the thick orange wire, all that is needed is to connect the purple trigger wire, and then a short negative wire from the relay to the battery's negative terminal. If you do not know how to connect such an easy thing as a relay you should really consider asking yourself if you should be taking on any wiring modifications in the first place. Hardwiring the fuel pump is a good method to ensure you get the maximum output from the standard 'intank' fuel pump, be it the oem mitsubishi one or the most commonly used aftermarket pump, the Walbro GS342. Although you may not realise it, you lose around 2 volts between the battery and the pump, this is known as 'voltsdrop' and is caused by the resistance in the oem wiring. A way to increase the voltage at the pump is to take a feed straight from the battery, via a relay, run in a thicker cable, and thus giving you less resistance = more voltage. This method is relatively easy on the Evo 7/8/9, it is slightly harder on the Evo 4/5/6 given the limited access but the wiring method is the same. One connection that no-one ever seem's to mention is the negative connection off the fuel pump. As an experiment i thought i would also try uprating this connection using a thicker gauge wire here too, piggy backing it onto the oem negative cable and simply fastening it down to the chassis at the nearest point. Imagine my surprise when i found this simple connection gained me another 0.5 volt ! A well worth while modification in itself! When i had finished insulating the new soldered connection i bound all the three new wires together in a nylon wrap for even better mechanical potection and replaced the cover. Last job is to reconnect the battery, turn the ignition on listening for the fuel pump to prime itself, and start the car up! Easy! You now have a pump delivering more fuel, at a higher pressure if need be, giving you less chance of the car running lean and potentially causing engine damage. If like myself you are running a Bosche pump in-line then you are also increasing the flow to that over what you would without the hardwire moditication, win, win, win! |
For the techies out there 'Grants' on the MLR forum upon dismantling an Evo 8 wiring loom has found the following :
Rich
I've just been disecting an Evo 8 loom and I'm surprised at how crap the standard fuel pump wiring is
There is in total a 14m + cable run
A breakdown:
3.1m (3mm2) from 15A fuse in front fuse box , to under dash relays (2) via 2 connectors
5.8m (2mm2) from under dash to relay 3 on front bulkhead and back via 5 connectors
1.3m (3mm2) plus 2.9m (2mm2) to pump and back to an earthing point near the drivers footwell via 4 more connectors
Add to that the fuel pump resistor, although it's next to the relay, has a 2.6m (0.85mm2) cable run and another connector
A quick voltage drop calculation (at 20degC), and adding 50mV per connection gives 1.92V
Add to the above, this loom and my VII, had an alarm inhibitor circuit spliced into the fuel pump cable adding a further 3m (1.25mm2 at best)
Your, polite , thoughts ?
Grant
PS
To anyone who doesn't understand - Evo fuel pump wiring leaves a lot to be desired
